Wire tinning: technology, purpose, tools, options and instructions
During repairs, modernization or installation of electrical wiring, special attention is paid to the quality of the connection of current-carrying conductors. Reliable soldered connections are the key to safe operation of electrical lines and household appliances. To secure the solder well, you must first tin the wires; the essence of the procedure is to coat the surface with tin.
Why Tinning Wires Is So Important
Tinning wires prevents oxidation
Before you tin the wire, you need to find out why this procedure is so necessary. Copper and aluminum, when interacting with oxygen, oxidize, forming an oxide film on their surface, which impairs conductivity and increases resistance. Tinning the wires avoids this. Wires are tinned with lead-tin solders; their advantage is a long service life, safety and reliability.
Tinning is also used during soldering, for example, when connecting LED strips to a power supply. If the wires of the lighting device are not tinned first, over time all the wires will fall off.
Tinning wires with a soldering iron
Tinning wires with a soldering iron
To get the job done efficiently, it is important to confidently use a soldering iron. If there are no established skills, you will not be able to tin and solder the wire.
There are different models of soldering irons, each with its own technical characteristics - power, dimensions, etc. It is recommended for a novice master to give preference to soldering stations where it is possible to regulate the heating temperature independently.
It is advisable to purchase an expensive device, since the process will take less time and the work will be done with joy.
Required Tools
Flux is selected depending on the wire material
Installation, modernization, repair and maintenance of wires is a troublesome task, but not difficult. To reduce the time spent, pre-prepare all the necessary tools and consumables for the job. The list looks like this:
- consumables include solder and flux;
- sharp knife;
- soldering station or soldering iron;
- technical or medical tweezers;
- ordinary pliers.
You can use not a well-sharpened knife, but special pliers that allow you to remove the entire insulating layer with a few movements. But their cost is quite high, so many people use a knife or scalpel.
In each case, a certain solder and flux composition for the cables is required, this must be taken into account.
Procedure
To tin the wire, you need to follow the following algorithm:
- Using a special tool, a knife or scalpel, remove the insulating layer from the wires that need to be connected.
- After removing the insulating material, clean the current-carrying conductors until a characteristic shine is formed. To do this, you can use a knife or sandpaper. If the work is to be done not with a cast core, but with a stranded wire, each wire is fluffed up and stripped separately.
- The soldering iron is plugged into the outlet and cleaned of all the contaminants that it likes to collect, especially old solder and dust. When cleaning the soldering iron wire, it is recommended to use light sandpaper.
- The tip of the wire needs to be heated. This can be done using a soldering iron, a gas torch or a regular lighter.
- When the soldering iron has warmed up to operating temperature, its core is touched to the solder and rosin. The working surface should be generously covered with melted tin.
- The next step is to touch the copper conductor with a hot soldering iron. The solder should be evenly distributed throughout the core. To apply solder, pliers and tweezers are used.
- At the end of the work, the cable or wire is carefully inspected. The working surface must be completely and evenly covered with solder. There should be no empty cavities or accumulations of substance. If shortcomings are found in the work, the procedure is repeated.
If you have to work with very thin wires, it is better not to use rosin, since it is very difficult to calculate the exact amount of the substance. Soldering acid is suitable as an analogue. You can treat the tip of the conductor with an ordinary brush. After this, you can begin applying solder. This method cannot be called more reliable, but with these types of wiring it is impossible to do otherwise.
Wire processing methods
Tinning with a wooden block
There are several methods of tinning. Some craftsmen prefer a method, the essence of which is to press the wires with a soldering iron to a flat wooden surface.
When heated, wood releases gases that act as flux, helping to remove oxides from the metal.
It is possible to remove the oxide film on the surface of conductive wires more efficiently using aspirin. During operation, the tablet is placed under the wires. When heated, acetylsalicylic acid releases gases that envelop the joint, displacing impurities that negatively affect the quality of the joint. This simple and inexpensive method provides high-quality tinning.
There is another way to prepare multi-core cables and wires in which the copper base is coated with enamel. It is preferable to use a small piece of PVC material as a substrate. When exposed to heat, polyvinyl chloride begins to actively release hydrogen chloride, which effectively destroys the oxide layer.
Tinning by dipping
If you have to work with wires and cables of large diameter, then it is advisable to carry out the preparation differently. In this case, complete and uniform distribution of solder is not easy to achieve.
There is a special device - a crucible, into which small pieces of tin are placed. There they heat up, resulting in molten metal. The end of the wire is first immersed in rosin or other types of flux, and then in the crucible container. This approach ensures complete and uniform distribution of substances at the cut site.
This method can only be used with fully tinned wires. Immersion is already on a completely different scale, and is carried out in industrial conditions. The process is implemented using a special coil with wound wire. First, the entire copper surface is manually processed with hard brushes; their bristles are first treated with liquid zinc chloride. Dissolved flux is obtained from a mixture of technical hydrochloric acid and zinc.
Next, the wire from the coil begins to slowly unwind and is dipped into a container filled with dissolved tin. The uniformity of the coating is ensured by secondary processing of the cable or large-diameter wire with rubber brushes. Finally, the cable is immersed in a container of cold water and brushed again. After this, the wires and cables are wound and packaged for further sale in hardware stores.
Source: https://StrojDvor.ru/elektrosnabzhenie/luzenie-provodov/
How to properly solder two wires with a soldering iron?
> Knowledge base >
24.09.2018
Every man wondered how to solder two wires. Performing such actions is required when repairing household and computer equipment, electronic devices and machine tools. Before you get an answer to the question, you need to familiarize yourself with the tools and materials needed for the work.
What you need for soldering
Before you start soldering wires, you need to prepare:
- Soldering iron. This is the main tool for working with metal products. It melts the solder, which is used to connect the elements of the microcircuit. The devices have different powers. The higher this indicator, the faster the soldering iron heats up. It is recommended to choose a tool with a power greater than 60 W. The soldering iron operates from a 220 V power supply.
- Solder. This term refers to a tin-based alloy used to join metals with a high melting point. Solder is a long wire, less often tin is sold in small pieces.
- Rosin (flux). Used for tinning microcircuit elements. Rosin provides reliable adhesion of metals to other materials.
Choosing rosin and fluxes
The choice of flux or rosin depends on what materials will be soldered:
- Tinned parts. In this case, liquid rosin is used. You can replace it with flux paste, which does not dry out and does not require removal of residues. Rosin gel has a gel-like structure, the product is easily washed off with water.
- Working with small radio components. Activated rosin fluxes, for example LTI-120, are suitable for this. Glycerin hydrazine paste also has positive qualities. However, after using this product, the parts must be degreased.
- Soldering of iron, brass and copper parts of small sizes. Liquid Rosin Lux copes well with the task.
- Connection of massive galvanized parts. In such cases, acid fluxes (orthophosphoric or soldering acid, Fim) are used. Acidic compounds work quickly, so the metal does not need to be heated for a long time.
- Soldering of aluminum parts. To solder these types of wires, in the past the soldering iron tip was usually treated with rosin. However, now F-64 flux is used to work with aluminum and copper, which provides good adhesion of the metals. The product contains toxic chemicals, so it is recommended to work in a ventilated area. F-34 flux, which has less activity, is considered safer.
Additional materials
Additional materials that simplify working with a soldering iron include:
- Stand. Provides convenience and safety of work. It is made from a thin metal sheet.
- Braid to remove excess solder. Consists of flux-treated thin copper strands.
- Device with clamps and magnifying glass. Provides convenience for working with small parts and a soldering iron.
- Clamps, tweezers, pliers. Makes it easier to work with heated parts.
Soldering process with an electric soldering iron
How to solder wires, what you need to do for this:
- Tin the soldering iron. To sharpen the tip, you need to use sandpaper until you get a smooth, shiny surface. After this, the heated tip is immersed in rosin and solder. The tip is applied to a wooden plank. The manipulations are repeated until the soldering iron tip acquires a silver color.
- Tin the wires. They are cleared of braid and coated with rosin, and a soldering iron tip is placed on top. After the flux has melted, the wire is removed.
- Solder the tinned parts. The tip of the device is treated with solder, the soldering area is heated to the required temperature. After covering the wires with tin, unnecessary movements are avoided. For quick cooling, use a fan.
Features of soldering when using flux
Soldering parts using flux has the following features:
- The melting point for rosin should be lower than for solder. This condition is considered mandatory for strong adhesion of the parts.
- The flux should not come into contact with molten tin. Each product forms a separate coating that ensures reliable connection of parts.
- Rosin should be evenly distributed over surfaces.
- Liquid flux must wet all parts to be sealed and have increased fluidity.
- It is necessary to choose a product that dissolves and removes films of non-metallic materials that appear on surfaces.
- It is necessary to use a flux that does not react with the materials being joined. This helps maintain the performance of the elements.
Source: https://odinelectric.ru/knowledgebase/kak-pravilno-spayat-dva-provoda-payalnikom
Soldering wires with a soldering iron: how to do it right
One of the most reliable methods of connecting wires is soldering. This is a process in which the space between two conductors is filled with molten solder. In this case, the melting temperature of the solder must be lower than the melting temperature of the metals being joined. At home, soldering is most often used with a soldering iron - a small device powered by electricity. For normal operation, the power of the soldering iron must be at least 80-100 W.
What you need for soldering with a soldering iron
In addition to the soldering iron itself, you will need solders, rosin or fluxes; it is advisable to have a stand. While working, you may need a small file and small pliers.
Most often you have to solder copper wires, for example, on headphones, when repairing household appliances, etc.
Rosin and fluxes
To get a good connection between the wires, it is necessary to clean them of contaminants, including oxide film. While mono-cores can still be cleaned manually, multi-core conductors cannot be cleaned properly. They are usually treated with rosin or flux - active substances that dissolve contaminants, including oxide film.
Both rosin and fluxes work well, but fluxes are easier to use - you can dip a brush into the solution and quickly process the wires. You need to put a conductor in rosin, then heat it with a soldering iron so that the molten substance envelops the entire surface of the metal. The disadvantage of using fluxes is that if they remain on the wires (and they do), they gradually corrode the adjacent sheath. To prevent this from happening, all soldering areas must be treated - the remaining flux must be washed off with alcohol.
Solders and fluxes for soldering copper wires with a soldering iron
Rosin is considered a universal remedy, and fluxes can be selected depending on the metal you are going to solder. In the case of wires, this is copper or aluminum. For copper and aluminum wires, use LTI-120 flux or borax.
A homemade flux made from rosin and denatured alcohol (1 to 5) works very well, and it’s also easy to make with your own hands. Add rosin to the alcohol (preferably dust or very small pieces of it) and shake until dissolved.
Then this composition can be used to treat conductors and strands before soldering.
Solders for soldering copper wires with a soldering iron use POS 60, POS 50 or POS 40 - tin-lead. For aluminum, zinc-based compounds are more suitable. The most common are TsO-12 and P250A (made of tin and zinc), grade A (zinc and tin with the addition of copper), TsA-15 (zinc with aluminum).
Convenient to use solder with rosin
It is very convenient to use solders that contain rosin (POS 61). In this case, there is no need to pre-treat each conductor in rosin separately. But for high-quality soldering, you must have a powerful soldering iron - 80-100 W, which can quickly heat the soldering area to the required temperatures.
Auxiliary materials
In order to properly solder wires with a soldering iron, you also need:
- Stand. It may be completely made of metal or have metal holders for a soldering iron attached to a wooden/plastic stand. It is also convenient if you have a small metal box for rosin. Soldering with a soldering iron is more convenient with a homemade or factory-made stand - not very important
- File. Before work, sharpen the tip of the soldering iron. It should be smooth and clean without traces of soot. Then it is easy to solder. This is how you need to sharpen the soldering iron tip
- Pliers. It is difficult to hold the wires with your fingers while soldering - copper and aluminum have high thermal conductivity, which leads to rapid heating of nearby areas. Therefore, it is more convenient to solder wires with a soldering iron if you hold them with pliers. The only thing is that the tool should be miniature, with thin handles and jaws. In principle, you can use tweezers, but it is advisable to put a heat-shrink tube on the top of it (where you hold it with your fingers) - the steel also heats up quickly. Pliers - to hold the wires
Alcohol may be required to wash off the flux, and electrical tape or heat-shrinkable tubes of various diameters for insulation. These are all the materials and tools without which soldering wires with a soldering iron is impossible.
The entire technology of soldering wires with a soldering iron can be divided into several successive stages. All of them are repeated in a certain sequence:
- Training of conductors. When soldering wires, they are freed from insulation. After this, the oxide film is removed from them mechanically. You can use a small piece of fine-grit sandpaper. The metal should shine and be light.
- Tinning. Heat the soldering iron to the melting temperature of the rosin (it begins to actively melt when touched). Take a conductor, bring it to a piece of rosin, heat it with a soldering iron so that the entire stripped part of the wire is immersed in rosin. Then take a drop of solder onto the soldering iron tip and spread it over the treated part of the conductor. The solder spreads quickly, covering the wire with a thin layer. To make it distributed faster and more evenly, the wire is turned slightly. After tinning, copper conductors lose their redness and become silvery. This is how all wires that need to be soldered are processed. Tinning the wires
- The tinned conductors are folded together, straightening them with your fingers so that they fit snugly against each other. If the soldering needs to be long, you can twist it. Holding the conductors, take solder onto the tip, press it to the soldering site, applying some force. At the same time, the soldering area heats up, the rosin begins to boil, and the solder spreads. When it covers the entire area and flows between the conductors, we can consider that soldering the conductors with a soldering iron is completed. They are held motionless for some time - until the solder cools down (to speed up the process, they blow on this place).
That's all. In the same way, you can solder two or more wires, you can solder a wire to some contact pad (for example, when soldering headphones, you can solder the wire to a plug or to a pad on a headphone), etc.
After you have finished soldering the wires with a soldering iron and they have cooled down, the connection must be insulated. You can wrap electrical tape, put it on, and then heat up the heat shrink tube. When it comes to electrical wiring, it is usually recommended to first screw on a few turns of electrical tape, and then put a heat-shrinkable tube on top, which is heated.
Differences in technology when using flux
If active flux is used rather than rosin, the tinning process changes. The cleaned conductor is lubricated with the compound, and then heated with a soldering iron with a small amount of solder. Further everything is as described.
Soldering twists with flux - faster and easier
There are also differences when soldering twists with flux. In this case, you can not tin each wire, but twist it, then treat it with flux and immediately start soldering. The conductors don’t even need to be cleaned—the active compounds corrode the oxide film. But instead, you will have to wipe the soldering areas with alcohol to wash away the remnants of chemically aggressive substances.
Features of soldering stranded wires
The soldering technology described above is suitable for monocores. If the wire is multi-core, there are nuances: before tinning, the wires are untwisted so that everything can be dipped in rosin. When applying solder, you need to make sure that each wire is covered with a thin layer of solder. After cooling, the wires are twisted into one bundle again, then you can solder with a soldering iron as described above - dipping the tip into solder, heating the soldering area and applying tin.
When tinning, multi-core wires must be “fluffed”
Is it possible to solder copper wire to aluminum
Aluminum cannot be combined directly with other chemically active metals. Since copper is a chemically active material, copper and aluminum are not joined or soldered. The point is too different thermal conductivity and different current conductivity.
When current passes, aluminum heats up more and expands more. Copper heats up and expands much less.
Constant expansion/constriction to varying degrees leads to the fact that even the best contact is broken, a non-conducting film is formed, and everything stops working. That's why copper and aluminum are not soldered.
If there is such a need to connect copper and aluminum conductors, make a bolted connection. Take a bolt with a suitable nut and three washers. At the ends of the connected wires, rings are formed according to the size of the bolt. Take a bolt, put on one washer, then a conductor, another washer - the next conductor, a third washer on top and secure everything with a nut.
Aluminum and copper conductors cannot be soldered
There are several other ways to connect aluminum and copper lines, but soldering is not one of them. You can read about other methods here, but bolted is the simplest and most reliable.
Source: https://stroychik.ru/elektrika/pajka-provodov-payalnikom
How to tin wires: step-by-step instructions - Site about
29.11.2019
It is not always possible to connect thin-section wires by twisting. Each connection is the most vulnerable point in the circuit, experiencing increased load. In order to get good contact, the insulation does not spark, the insulation does not burn, the wires must be carefully adjacent to each other. Soldering is indispensable.
Knowing how to use a soldering iron correctly is very important. The normal operation of the assembled electrical device will directly depend on this!
To understand how to solder wires correctly, we will first gain theoretical knowledge about the process: we will become familiar with the materials that need to be connected, the specifics of the work. Then, according to the instructions, we will practice.
Solder and flux. What are they needed for?
Soldering is the process of welding two parts together. Only instead of an electrode, solder is used - an alloy of lead and tin. Flux is used to wet the soldered surface and protect it from oxidation. This is usually rosin made from pine resin. In appearance and color it resembles a piece of amber.
Solder comes in the form of a wire or tube with flux inside. The first option is more popular. Flux is used in any case.
Depending on the connection methods and soldering of wires, the appropriate type of solder is selected. The darker it is, the more lead it contains; it is designed for a higher melting point.
Solder for certain purposes is selected according to its marking. Decoding the designation code is very simple: the letters indicate that the solder consists of tin and lead, the numbers indicate the percentage of elements
For household purposes, solder of the POS 60 brand is optimal, the melting point of which is about two hundred. Despite the low lead and high tin content, the connection will be quite strong.
Preparation
In order to start soldering, you need to acquire the necessary tools. Here's what we need:
- Rosin, acid, flux;
- Screwdriver Set;
- Tin-lead solder – POS 60;
- Pliers;
- Tweezers;
- Nippers, side cutters;
- Hammer;
- File, sandpaper;
- Medium power soldering iron (40 – 60 Watt)
Pre-clean the surface to be soldered. We use sandpaper and a file. We sharpen the soldering iron tip - two edges when it is new. We remove old solder if it was previously used. To do this, clean it with a file and wipe it with a sponge.
Plug in the soldering iron
The heating element is a nichrome wire wound around a tube, hidden under a casing. There is a sting at the end of the tube. Nichrome, heating up under the influence of the current passing through it, heats up the sharpened working edges.
To check the readiness of the soldering iron, touch it to a piece of rosin. If there is a small stream of smoke, you can start working. Thick smoke will pour out - the soldering iron has overheated. You'll have to cool it down a bit. Disconnect from the network.
- It is best to use a thermostat so as not to constantly pull the plug back and forth from the socket.
Wire soldering process
Looking at the numerous photos showing how to solder correctly, you might think that this is a terribly complicated process. There is a certain amount of truth in this. You need skills that you can’t do without. In particular, the ability to use pliers, tweezers, flux, solder, and monitor the condition of the soldering iron.
You will have to learn a lot to do everything efficiently. Soldering printed circuit boards is truly a delicate job, and you can’t do it without a lot of preliminary training.
You can start with a simple connection of wires. Then move on to more complex, responsible designs.
To learn how to solder with rosin and tin and, most importantly, to understand how it’s done, let’s practice a little:
- Let's take a stranded copper wire;
- Cut it into 12 pieces 40 mm long;
- Clean the ends by 5 mm on all sides;
- We take one wire with pliers and begin to tin its ends. First, we bring the soldering iron tip to it and heat it up. Then cover with a thin layer of rosin. Apply solder evenly on top.
- When we have tinned 12 wires with a soldering iron, we begin to solder them. The strength of our structure will depend on how well this is done.
- We put the ends of the wires on top of each other, heat them up, apply flux and solder.
- We are waiting for the joints to cool down. We don’t blow, we don’t cool with slobbering fingers.
- As a result, we should get an equilateral cube.
- We place it in the palm of our hand and squeeze it. If the soldering was of high quality, the wires will not move away from each other. If not, then it would be nice to practice some more!
- Now you can find various master classes with photos and video illustrations on how to solder correctly step by step and do it efficiently.
There is practically nothing complicated in this matter. It is important to monitor the condition of the soldering iron so that it does not overheat or cool too much.
A well-heated surface absorbs solder well. Therefore, it is important to get used to working with solder and flux at the optimal hot tip temperature.
The instinct when it is time to solder comes with time after numerous trainings. Naturally, at first everything will look and turn out sloppy. After numerous trials and errors, you will develop your own style of work, and the soldering itself will look better and better.
Photo instructions on how to solder correctly
Source: https://orensbyt.ru/osveshhenie/kak-ludit-provoda-poshagovaya-instruktsiya.html
How to properly connect stranded wires to each other
In stranded wires, the cross-section is formed by several, sometimes intertwined, cores. Knowing how to connect stranded wires to each other, you can easily do this work yourself and get a strong contact that is absolutely safe during operation.
Where are stranded wires used?
Any stranded conductor contains at its base a large number of thin wires. The use of a multi-core cable is important in areas that require a large number of bends or, if necessary, to pull the conductor through holes that are too narrow and long enough.
The scope of application of stranded conductors is presented:
- extended tees;
- mobile lighting devices;
- automotive wiring;
- connecting lighting fixtures to the electrical network;
- connecting switches or other types of levers to influence the electrical network.
Flexible stranded conductors can be twisted repeatedly and easily, which does not negatively affect the functionality of the system. Among other things, this particular type of electrical wiring is distinguished by plasticity, and greater flexibility and elasticity is imparted to the wire by weaving a special thread, which in strength and composition is a bit like nylon.
Methods for connecting stranded wires to each other
The methods used today for electrical connections of stranded conductors are distinguished by the ability to obtain not only strong, reliable and durable, but also completely safe contact of the conductors.
Stranding of stranded conductors
This option is the easiest to implement and intuitive, not requiring the use of special equipment or professional tools.
Twisting is the easiest way to connect stranded wires
- Strip the conductors at the ends of the conductors from the insulating layer and place them on top of each other. Twist the exposed strands overlapping each other.
Before connecting the wires, the ends must be cleaned
-
Strengthen the twist using pliers. Simple parallel twisting is quite reliable from the point of view of contact between the cores, but vibration and mechanical forces applied to break can easily destroy the strength of such a connection.
Use pliers to twist the wires together
The second method consists of the following steps:
-
Strip the conductor cores from the insulating layer and place them on top of each other crosswise.
Peel the insulating layer of the wires and stack the wires on top of each other
-
Wrap one bare wire around the other over the entire surface.
Wrap one wire around another
Wrap the wires
-
Visually verify the strength of the winding. Using simple or traditional twisting, the electrical connection of additional conductors to the main, leading electrical wiring line is carried out.
Twisting wires using the third method:
- Remove insulation from the ends of the conductors. Place the bare ends on top of each other and wind the first core.
Place the wires on top of each other
- Wind the second core, then visually verify the reliability of the connection. The sequential twisting method involves “winding” each connected conductor onto another, which ensures optimal contact of the cores.
Wind one of the cores
In this method, one wire is “wound” around another
There is also a fourth method, which is as follows:
- Using a sharp knife, strip the ends of the conductors from insulation and align them along the length.
Align the wires in length
-
Bend the connected stripped ends and wrap them with a piece of another core.
Twist the folded strands with a piece of conductor
-
Perform a visual inspection of the connection and make sure it is secure. Band twisting consists of parallel application of the connected cores to each other and subsequent fixation of the resulting connection using a tightly laid soft conductor.
Bandage twisting ensures a reliable connection of cores
Soldering method
Soldering the conductors using a household soldering iron ensures high-strength contact and good electrical conductivity. Tinning of stranded conductors is carried out using rosin (flux) and standard solder using standard technology.
- Strip the wires of insulation and remove any resulting oxidation if necessary.
Remove all oxidation from the wires
-
Heat the wires with a soldering iron tip until the flux melts and immerse the heated wire in a container with rosin.
Heat the wire with a soldering iron and immerse it in rosin.
-
Apply molten solder to the soldering iron tip and carefully transfer it to the exposed parts of the core. After tinning, the wires should be connected to each other by twisting, which must be “tightened” with pliers.
Tighten the twist with pliers
Terminal type connections
The use of terminals of different types is the most accessible way to connect multi-core wires in everyday life. In most cases, the terminal blocks used are divided into a couple of main types.
The principle of operation of clamping terminals involves fixing the wire using a built-in spring mechanism.
Terminals are often used to connect wires
The screw-type terminal block involves reliable fixation of all connected stranded wires using a screw. To increase the area of wire contact with a conductive surface, an additional bend of the core is required.
The wires in the terminal block are secured by tightening the screws
Stage-by-stage execution of work:
- Strip the ends of the conductor and align them in length according to the depth of the terminal block.
Align the wires in length
-
When connecting more than one conductor to the terminal block at the same time, you must first connect the wires by parallel twisting.
First you need to twist the wires
-
Check the reliability of the twisting and then fix the wires in the connector hole.
Fix the wires
Crimping method
The crimping method involves connecting wires or cables using a copper or aluminum sleeve using special crimping pliers of a hydraulic or manual type.
In this case, the connection is made using a special sleeve
The pressing technology involves stripping the insulation according to the length of the sleeve, and conductors that are too thin should be connected by twisting. Then all the cables are folded together and placed inside the sleeve, after which double crimping is performed along the entire length. The method allows for a reliable and safe connection of multi-core wires made of different types of materials.
Bolted connection
The simplest, but not reliable enough way to connect stranded wires is twisting followed by bolting. This detachable connection option is most often used in open wiring conditions.
Bolted connection is the simplest, but not very reliable
To increase the level of reliability of the connection of stranded wires, it is recommended to strip the ends of insulation, then tin the cleaned areas and fasten them with a bolt.
Application of connecting insulating clamps
PPE elements are used when it is necessary to connect multi-core wires with a small cross-section (within 25 mm2). The design feature of this clamp is a plastic body with a built-in cone-shaped spring.
This method is suitable for connecting wires with a small cross-section
Stranded wires are first connected into one bundle using twisting, onto which the clamping part is then screwed. Among other things, the wire connection does not require additional insulation.
Welding method
A permanent connection is the most reliable method when working with multi-core wires. When welding is performed correctly, the general indicators of mechanical strength and contact resistance in terms of reliability do not differ from similar parameters of a solid conductor.
Welding connection of wires is considered the most reliable
Welding can be performed on alternating and direct current. At the preparatory stage, the wires are stripped of insulation, after which they are twisted and straightened by trimming the ends. To ensure that the conductors do not overheat during the welding process, it is necessary to ensure high-quality heat removal.
Security measures
In order to ensure safe operation of connected stranded wires, it is important to insulate all parts of the electrical wiring.
Proper insulation helps prevent dangerous contact of conductive parts with each other or with the human body.
When choosing an insulating material, it is necessary to take into account the operating conditions of the electrical circuit, but in most cases, insulating tape, as well as a special vinyl or heat-shrinkable tube, are used for this purpose.
If the connection area is exposed to the negative effects of high temperatures, it is recommended to use varnished cloth or fabric insulating tape as an insulating material.
Correct execution of all stages of electrical installation is of no small importance.
Only with reliable connection and proper connection of all elements of the electrical network is it possible to minimize the risk of areas with poor contact, and also prevent local overheating and electrical wiring breaks.
Multicore cables are a popular and widespread option, widely used for arranging electrical wiring for various purposes. The general rules for the separate connection of stranded and single-core conductors do not have any differences or features, therefore it is allowed to use twisting, screw clamps, PPE elements, welding and soldering for this purpose.
Source: https://aqua-rmnt.com/ehlektrosnabzhenie/kak-soedinit-mnogozhilnyie-provoda-mezhdu-soboy.html
What kind of solder to solder copper wires
A soldered connection is considered one of the best in terms of reliability in electrical engineering, and in radio engineering, soldering of radio components is indispensable during their installation.
Soldering is the joining of homogeneous and dissimilar metal parts using a metal alloy called solder, which has a melting point lower than the structures being soldered.
Physics of soldering processes
Molten solder behaves like a liquid, one of the properties of which is surface wetting - that is, the distribution of molecules over the surface in a thin layer.
Solder molecules diffuse in the surface layer of the metal, which, in turn, partially dissolves in the solder.
An important role is played by the type of surface and its contamination, as well as the presence of an oxide film.
In short, soldering two wires means moistening their surfaces with a continuous layer of molten solder, which, once hardened, will provide mechanical strength to the connection and reliable electrical contact.
Since copper conductors are used in household electrical wiring, we will mainly talk about how to solder copper.
The process of soldering copper wires is not so demanding in terms of the choice of solder, flux and temperature, so anyone - you need to acquire minimal equipment and follow safety rules.
Soldering tools
A heating device used to heat solder and soldered structures is called a soldering iron.
This is what a soldering iron consists of
Types of soldering irons common in everyday life:
The heating element heats up the copper tip, the end of which is the working surface of the tool.
This type of soldering iron is the most common, therefore, we will tell you how to properly solder wires using this particular tool, with a power of 60-100 W, tip temperature up to 300ºC;
- hot air and gas.Gas burnerThermal air
A stream of hot air or an open flame heats up the soldering area, to which solder is supplied in the form of filler wire.
Due to the high thermal power of these tools, they are used for soldering massive parts that require a lot of heat to heat up;
The copper tip is made in the form of a massive hammer, heated by an open flame or a built-in electric heating element.
You can solder without electricity using a hammer soldering iron. Due to the large heat capacity of the tip, with proper skill, the master can solder all the wires in the junction box with one heating.
Selecting consumables
You need to purchase low-temperature tin-lead solder type POS. The number following the abbreviation indicates the percentage composition of tin.
The most popular brand in radio electronics and electrical engineering is POS-61 (a foreign analogue of Sn63Pb37) due to the coincidence of the temperatures of the initial and complete melting of the alloy (190ºС).
Solders of other brands have a temperature range in which the alloy is in a specific eutectic state and looks like a paste of fine-grained granules. Light movement of parts in this temperature range significantly impairs the quality of soldering.
POS-61 is not subject to this eutectic effect and passes from the solid phase to the liquid phase and vice versa immediately after reaching a temperature of 190ºC, so for beginners it is best to use this particular brand of solder, which is sold in coils in the form of wire or a tube with rosin. Rosin is most often used as a flux for soldering copper wires.
as well as soldering acid based on zinc chloride - their role will be discussed below.
Wire tinning process
Cleaning surfaces before soldering is the most important step in this process. First you need to remove the insulation from the wires and make sure that there is no enamel coating or oxide film on them.
Stripping copper wires
Cleaning the surface of the conductor to a metallic shine using a knife or finely abrasive sandpaper will help in tinning - this is the name of the process of wetting the solder area with solder. To do this, you need to touch the rosin with the heated tip of the tip - the characteristic hissing and boiling of the flux will indicate the normal temperature of the soldering iron.
Wire tinning
Without delay, so that the rosin does not evaporate, you need to take a drop of solder by touching the unwound POS-61 wiring.
In this case, the flux prevents the oxidation of the solder.
The second function of rosin or soldering acid is to decompose the oxide film on the metal surface.
Tinning
Tinning is best done by pressing the wire with a soldering iron tip to a wooden plank - the gases released during the pyrolysis of wood also partially help, acting as a flux.
Much better results are achieved using an aspirin tablet as a support. Acetylsalicylic acid, when evaporated, effectively removes the oxide layer.
tinning of twists
The nuances of tinning
Solder is spread over the surface of the wire, rolling it along the axis. If the exposed conductor is not completely tinning, and the rosin stops boiling, then you need to re-tip the flux and POS if necessary.
Soldering wires
Tinning a stranded wire is the same, but it needs to be twisted so that the wires twist and do not unravel.
It is often necessary to tin thin stranded wires coated with enamel.
Since stripping with a knife is impossible due to the thin veins, the enamel is removed chemically - for this, a piece of polyvinyl chloride insulation is taken as a substrate.
tinning of stranded wires
By placing the wires on the insulation, tinning is carried out - when heated, the PVC releases chlorine, which corrodes the enamel, thereby opening up the access necessary for tinning to the metal surface.
how to solder wires from process to process
Soldering process
In fact, the answer to the question of how to solder correctly will be in one word: tinning, since soldering two tinned wires is not particularly difficult. Since in electrical engineering it is not recommended to solder overlapping wires, they are twisted before soldering.
twisting of stranded wire
Having twisted two or more tinned wires, take rosin and solder again and touch the twist, waiting for the alloy to completely spread between the wires, filling the voids and gaps.
Soldered Copper Stranded Wires
After this, removing the soldering iron, you need to let the solder cool down without exposing it to mechanical stress.
You can treat the twisting of untinned wires with acid and solder them at the same time as tinning.
The soldering iron tip must be periodically cleaned of carbon deposits.
soot
and sharpen when burned out, as well as re-tinning.
How to solder aluminum?
Aluminum wires found in old electrical wiring can also be soldered, and in theory this process is no different from the one described above.
But in practice, highly active aluminum instantly oxidizes during cleaning, and the oxide layer prevents tinning, so it will not be possible to tin an aluminum wire in the usual way.
For these purposes, special fluxes and high-temperature solders are used.
Using sandpaper, the oxide layer is reduced, thereby helping the flux.
For tinning aluminum surfaces, use a high-temperature soldering iron or gas torch.
The popular method of soldering aluminum is to add metal filings to rosin.
Using this abrasive, grinding a mixture of solder and flux, tinning is achieved, but this process is very labor-intensive and does not guarantee quality.
Source: https://steelfactoryrus.com/kakim-pripoem-payat-mednye-provoda/
Technology for proper tinning of wires
You are here: We have already told you about how to solder wires at home, where we stopped a little at this stage of soldering, such as tinning bare copper wires. Now we will tell you in more detail why tinning wires and how to do it correctly without experience in working with a soldering iron. The instructions will be provided as follows - first we’ll talk about why tinning is needed, after which we’ll talk about all the nuances of this process.
Why is this so important?
The fact is that copper can oxidize in air, which often leads to poor contact between wires. Subsequently, the poor contact begins to heat up and, as a result, a fire may occur in the electrical wiring. To prevent this from happening and to make the connection of electrical wires by soldering durable, reliable and safe, it is necessary to tin the stripped ends of the wires using lead-tin solder.
In addition, tinning is used during soldering, for example, when connecting an LED strip to a power supply. If the conductors of the LED strip are not tinned, the soldering point will be unreliable and it is possible that the wiring will fall off over time.
Step-by-step instruction
So, to make it clear to you how to tin wires correctly, we provide step-by-step instructions in pictures:
- Prepare the necessary tools: a sharp knife, tweezers or pliers, a soldering iron, solder and flux (in our case, rosin).
- Remove the PVC insulation from the conductor. To do this, it is best to use an insulation stripping tool, but if you don’t have one, a knife will help. You need to strip the insulating layer by 10-20 mm.
- Carefully, using the same knife, strip the core to a metallic shine. If the wire you need to tin is stranded, fluff up all the wires and very carefully strip them with a knife.
- Connect the soldering iron to the mains and wait until it warms up. By the way, before tinning you need to clean the soldering iron tip from debris and old solder. We recommend using a file for this.
- Run the heated tip along the tip of the wire that you are about to tin.
- Touch the soldering iron tip to the rosin, and then immediately to the solder. The working surface of the soldering iron should be evenly covered with tin.
- Touch the copper wire with the sting. The solder should be evenly distributed along the copper core. For better tinning, we recommend taking the conductor with pliers or tweezers, and then tinning the tip from all sides, twisting the wire yourself.
- Visually check how well you managed to tin the cable. The photo below is an example of a job well done. If not the entire working surface is covered with solder, repeat steps 6 and 7.
In this way you can tin wires efficiently and quickly at home. Please note that tinning thin wires from headphones (or a microphone) needs to be done a little differently. Since the wires are enameled (opened with varnish), you must first carefully clean off the enamel with a sharp knife. After this, it is necessary to perform tinning with a soldering iron.
lessons on the topic:
You can tin wires without rosin - using special soldering acid. In this case, you first need to treat the working surfaces (tip and tip of the wire) with a brush dipped in acid, and then apply solder.
Both methods can be used without fear for the quality of the future connection. As for a thick wire, it is easier to tin it than a very thin one.
A little skill and even less time will be required, the main thing is not to forget to clean the surface of the core with a knife.
Using this simple technology, you can perform tinning with a soldering iron yourself. We hope that now you know how to tin wires and why it is needed. If any point was not clear to you, we recommend watching the visual video instructions or asking a question in the comments!
Be sure to read:
- Learning to solder wires - consideration of all the nuances of soldering
How to Measure AC and DC Voltage
Source: https://samelectrik.ru/texnologiya-pravilnogo-luzheniya-provodov.html
Tinning wires: necessary materials and sequence of actions
There are various ways to connect individual electrical conductors. The quality of the contact obtained determines the reliability, safety and uninterrupted operation of the entire electrical circuit. To achieve these indicators, it is necessary to tinning the wires.
Modern conductors are made of non-ferrous alloys coated with an insulating layer, which is accompanied by increased resistance to corrosion. When connecting them, it is necessary to strip off part of the insulation. This leads to the formation of contact with the air and, over time, to oxidation of the conductor surface.
Tinning the wire prevents oxidation of the conductive material
Note! If there is a weak contact, increased heating will be observed at the junction of the wires. At best, it will end in a break in the electrical circuit, at worst, in a fire.
To eliminate these problems, stripped sections of wires should be tinned. Maintenance will remove oxide impurities from the exposed cable cores and increase the adhesion between the connected elements.
List of materials and tools required for tinning wires
It is possible to properly irinate the connected cable cores only after preliminary preparation. It consists of collecting the required material and tools. To carry out tinning you will need:
- Insulation coating removal device - used to remove polymer, varnish or fabric insulation. In this case, the core is not subject to mechanical damage. Such a tool is quite expensive. If you don't have one, you can use a utility knife or scalpel.
- A means for holding conductors - the tinning process is accompanied by heating the cable cores and various solders to high temperatures. Therefore, you will need to prepare pliers, tweezers, wire cutters or a similar tool.
- Solders and fluxes are materials used directly for tinning conductors. Initially, the electrical wire is treated with flux to clean the surface. Then a layer of solder is applied. There are various types of these materials, which are selected for a specific conductor alloy.
- Device for heating solder - selected based on the required type of soldering. For local tinning of small cross-section cable cores, soldering irons or soldering stations are used. To tin wires with thick cores, a crucible or oven is used. Their design provides for a special bath, which is filled with a tinning mixture.
Set of tools for tinning wires
The correct sequence of actions when tinning conductors
Let's look at the process of tinning conductors using a soldering iron as an example, since this method is the most common. The following is a step-by-step procedure:
- The insulation layer ranging from 10 to 50 mm is carefully removed so as not to directly damage the cable cores.
- If there is a varnish coating on the surface of the conductor, it is removed. This can be done using a knife, sandpaper or special chemicals.
- The soldering iron tip is cleaned from residual solder and other components.
- The soldering iron is connected to the electrical network and heated to operating temperature. If you have difficulties determining it, you should try to touch the solder with the tip of the device. It should melt instantly.
- At this stage, the conductive wires are treated with flux, in our case rosin. Using a soldering iron, you need to heat the stripped ends of the conductor and lower them into a jar of flux. After this, wait until the rosin melts and turn the core completely under the soldering iron tip. The technology for using other types of fluxes may vary;
- Now all that remains is to tin the conductor with solder (tin). To begin with, the solder is heated and applied to the soldering iron tip. After this, the tin is brought to the tip of the conductor and spreads evenly over the entire surface. If you follow the correct technology for processing the cores with flux, the tin will independently cover the required area. It will be enough to simply turn the end of the conductor at the soldering iron tip.
- The resulting layer of solder is carefully inspected for the absence of chips, voids and bulges. The tin should lie evenly on the stripped edge of the conductor and have a smooth surface with a light tint.
Subtleties of tinning wires
Tinning wires consists of many nuances that become accessible with experience. Below are some tips from the professionals on how to make the maintenance process easier and better:
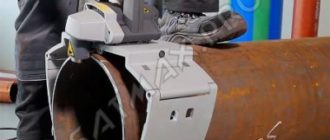
- To tin a long length of wire, it is more advisable to use a crucible or oven.
- When soldering factory parts, no maintenance is required. All contact parts have already been cleaned of impurities.
- It is much easier to remove the varnish layer from small cross-section conductors using a lighter. It is enough to burn the contact part and remove the resulting carbon deposits.
- When working with solder, it is recommended to use the flat part of the soldering iron tip.
- Old soldering irons heat up to high temperatures over time. This causes the solder to roll off the tip during the soldering process. To eliminate this problem, you should connect the device to the electrical network immediately before performing maintenance.
Using the flat part of a soldering iron tip to tin braid
Options for servicing wire without rosin
Let's figure out what to do if you don't have rosin on hand, and the work needs to be done as soon as possible. Below are the most current solutions to the current situation.
Amber, animal fat and resin
This option is suitable for processing multi-core cables with a thin cross-section (power supply conductors for headphones, power supplies). To prepare the flux, you will need to melt the three indicated components at the same time, stirring constantly. This is necessary to obtain a uniform consistency. The disadvantage of this method is the formation of an unpleasant odor from the prepared solution.
Using amber to replace rosin
Batteries and aspirin
To service copper alloy conductors, you can use the following available tools:
You will need to drain the electrolyte from the used battery device and use it.
Draining electrolyte from an old battery
When using aspirin, it is recommended to use the classic form of the drug. The tablets are ground to a powder and dissolved in water or alcohol-containing liquid. Respiratory protection measures will need to be taken. You can use a cotton-gauze bandage or use a hood. Both options are accompanied by the release of harmful gases.
Tinning wires using an aspirin tablet
Universal acids
This method involves the use of alkaline agents. The conductor and solder are thoroughly cleaned first. Processing is carried out with stearin, the most affordable option is a candle. It must be melted and evenly applied to the surface to be treated.
Boric acid can be used to replace flux
Unusual options
You can also tin the wire without rosin using an extravagant method, using a substance for rubbing bows. It must be dissolved in pure alcohol, and then the prepared core must be processed. Over time, the alcohol will completely dry out, and the cable will receive the required tinning.
Rosin for bows Thomastik Euphon
You can tinning the wires yourself, following a certain procedure. It is necessary to select the correct solders for a specific alloy of the conductor.
Tinning wires: necessary materials and sequence of actions
0,00 / 0
Source: https://220.guru/electroprovodka/provoda-kabeli/luzhenie-provodov.html
Wire tinning technology
» Electrical wiring » Wires and cables » Wire tinning technology
We have already looked at how to connect wires at home, but if you want to make high-quality electrical wiring in the house, then you simply cannot do without tinning copper wires and cables. Therefore, we decided to tell you in more detail how to tin wires, why to do it and how to work with a soldering iron correctly. We will also provide detailed instructions that will allow you to do everything correctly and quickly.
Why tin the wires?
Many people do not quite understand why all this needs to be done at all. But the fact is that in air, copper begins the oxidation process, which accordingly leads to a deterioration in the contact between the wires. If this contact is too weak, it begins to overheat, and the wiring may catch fire. To avoid this, it is necessary to tin all the stripped cores, especially since doing all this is not at all difficult.
You can also use tinning when connecting LED strips by soldering. In this case, it will become more reliable, over time the contacts will not fall off and will delight you with beautiful light in the room for a long time.
How to tin wires: step-by-step instructions
So that you can tin the wires correctly, we decided to tell you detailed instructions in pictures. If you read everything carefully, you shouldn't have any problems.
Preparing tools
Before you start tinning, you should gather the following tools:
- A sharp knife, preferably a stationery knife.
- Pliers or tweezers.
- Solder, flux or rosin. The easiest way to work is with rosin.
- Soldering iron.
How to tin your own wires:
- You need to remove the insulation from the conductor; you can use an insulation stripping tool; if you don’t have one, use a regular knife.
- After removing the insulation, you need to strip the wires to a metallic shine. If you have a stranded wire, then you need to fluff up all the conductors and strip them. It is best to strip each core separately - it is more convenient.
- We turn on the soldering iron and clean it of dust and old solder, which it likes to collect. Use small sandpaper when cleaning it.
- Heat the tip of the wire (just run it with a hot soldering iron).
- Touch the soldering iron to the rosin and solder. The working surface must be covered with tin.
- Next, take a soldering iron and touch the copper conductor. All solder should be applied evenly to the core. To improve this process, you need to use tweezers or pliers to tin the tip of the wire from all sides, at this time you need to scroll it, this will significantly save time.
- Take a close look at your wire or cable. The working surface should be completely covered with solder. If you see that there are places without solder and the conductor is just visible, then start tinning again.
Note! You cannot tin the headphone wires this way. They have special features, because all conductors are enameled. Initially, you need to remove all the enamel, and then use a thin soldering iron and tinning the headphones.
If the wires are very thin, then it is better not to use rosin at all, because it is difficult to guess with its quantity. In this case, it is optimal to use soldering acid. You need to use it to treat the tip of the conductor with a regular brush. Next, use a soldering iron to apply solder. This method cannot be called more reliable, but with thin conductors it will not work any other way.
How to tinning: video
We have also collected several interesting videos that will help you tinning your wires correctly.
How to tin wires at home:
How to repair headphone wires by tinning:
We make tinning on a large cross-section wire:
We also recommend reading: ASB cable: technical specifications and detailed review.
Source: https://vse-elektrichestvo.ru/elektroprovodka/provoda-i-kabelya/texnologiya-luzheniya-provodov.html
Fast tinning of wires
When installing or repairing electrical wiring, it is important to make the soldered connection correctly. Operational safety, reliability, and durability of the power supply depend on this.
To secure the solder well, you must first tin the wires, that is, cover them with tin solder. The applied layer will remove oxide impurities formed on copper or aluminum alloys and improve the adhesion of consumables.
There are different tinning methods. The choice is made taking into account the composition of the metal, the nature of the cross-section, the purpose of the wiring and its operating conditions.
Soldering with a soldering iron
Confident use of a soldering iron is necessary for every novice craftsman. Without established working skills, it will not be possible to tin a wire and then carry out soldering.
Everyone can choose the soldering iron dimensions and modification independently. Soldering stations and soldering irons with the ability to regulate the heating temperature are easy to use.
It makes sense to spend money on purchasing quality tools and equipment. Then your work will be enjoyable for many years.
Required Tools
Working with wires is not difficult if you are well prepared for it. It is advisable to do everything in advance so that later at the most inopportune moment you don’t have to fuss. The list of tools that allow you to tin wires or cables is as follows:
- well sharpened knife;
- medical or technical tweezers;
- regular pliers;
- soldering iron or soldering station;
- consumables (flux, solder).
Instead of a knife, special pliers are now sold that allow you to rip off the insulation in one motion. But they are not that cheap, so many people make do with a knife or scalpel.
All the tools and devices are simple, but very useful. Consumables mean a certain flux composition and solder suitable for a given type of wire.
Correct procedure
Wires should be tinned using a soldering iron in accordance with an algorithm verified by many years of practice. At the very beginning of work, you need to carefully remove the outer insulating layer of the wires with a knife or pliers. It is advisable to remove at least 10 mm and maximum 50 mm from the polymer coating from each connected end.
After this, use the same knife to clean the surface to a shiny state. This will eliminate the presence of remnants of the insulating sheath and remove oxide deposits from the wires.
Thick wire is easier to hold and clean. If the cable includes several thin wires, it is advisable to fray them, separate them, strip them on all sides, and then twist them again.
Then you can heat up the soldering iron, first checking the cleanliness of the tip. The surface will only be well tinned with a completely clean soldering iron tip.
Using a heated soldering iron, you should heat the prepared, thoroughly stripped ends of the wires, dipping them in rosin. The rosin needs to coat the wire well.
Use the soldering iron tip to take the solder and evenly distribute the mixture along the cut of the wires, which are fixed with tweezers or ordinary pliers. To ensure complete application of the mass of molten consumables, the wires should be rotated around their own axis.
Copper wire can be treated not only with rosin, but also with acidic flux. Some people prefer to use ready-made soldering acid, which is always commercially available. A special flux is provided for tinning aluminum wires.
If all previous operations were performed correctly, the molten solder material will well cover the contact area of the wires. You need to carefully inspect the entire working area to make sure that the tinning was successful.
Wire processing options
Some craftsmen like the tinning method, in which the wires are pressed onto a piece of wood with a soldering iron.
This is a completely acceptable technology. The gases released when a wooden substrate is heated act to some extent as a flux, helping to remove oxides from the metal.
Aspirin melt removes oxidation products even better. The tablet can be placed under the wires when tinning. The gases released from heated acetylsalicylic acid well envelop the joint, removing all impurities from them. As a result, the wires will be successfully tinned.
There is a unique method for preparing multi-core wiring, in which a thin copper base is coated with enamel. In this case, craftsmen recommend using a piece of PVC material as a substrate.
As the temperature rises, polyvinyl chloride begins to release hydrogen chloride vapors, which, like hydrochloric acid, quickly destroy the oxide layer. As many video tutorials show, the PVC backing may not be very large, corresponding to the size of the tinning working area.
How to service earphone contacts
Microphones, iPhone headphones and any other acoustic gadget are constantly exposed to mechanical stress. As a result, the wiring breaks.
It will not be possible to prepare them for soldering using conventional methods. The varnish on top will interfere. Before tinning, it is either scraped off with a sharp scalpel or burned. You can also tin the rosin with a very hot soldering iron, which will remove the varnish.
A thin strand of wire is placed in rosin and heated with a soldering iron. Then, using a soldering iron, a thin layer of molten tin is distributed at the site of future contact. After this, the connection is made quickly. It will serve for a long time and reliably.
Source: https://svaring.com/soldering/praktika/luzhenie-provodov
How to tin wires correctly? — Metals, equipment, instructions
When installing or repairing electrical wiring, it is important to make the soldered connection correctly. Operational safety, reliability, and durability of the power supply depend on this.
To secure the solder well, you must first tin the wires, that is, cover them with tin solder. The applied layer will remove oxide impurities formed on copper or aluminum alloys and improve the adhesion of consumables.
There are different tinning methods. The choice is made taking into account the composition of the metal, the nature of the cross-section, the purpose of the wiring and its operating conditions.