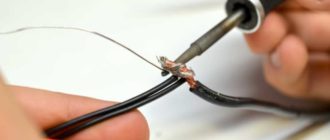
How to tin a soldering iron tip
During operation and storage, an oxide layer forms on the soldering iron tip. It interferes with high quality soldering. To remove this layer and prevent its re-formation, tinning is performed, or coating the copper surface with a protective layer of tin alloy. There are many different tinning methods. Before surgery, the sting must be thoroughly cleaned.
How to tin a soldering iron tip
Basic information about the tinning process
Tinning is divided into initial, carried out on a new or long-stored soldering iron, and working, performed immediately before soldering.
How to tin a soldering iron tip? First, the tip is mechanically cleaned of scale, oxide film, slag and other contaminants, then a thin layer of molten solder, most often tin-based, is applied to the prepared surface.
For mechanical cleaning the following are used:
- abrasive stone;
- sandpaper;
- another soldering iron.
Cleaning a soldering iron with a non-burn tip
For inexperienced soldering workers, craftsmen recommend starting with a file. As the solder strengthens his skills, he selects the most convenient stripping methods for himself.
Preparation and Maintenance
The more intense the work, the sooner the soldering iron tip burns out and becomes overgrown with scale scales.
During prolonged heating to high temperatures, the copper from which the tip is made partially transforms into molten tin, and partially abrades on the soldered surfaces and contacts. Physical and chemical erosion of the substance occurs. In addition, under the influence of heat, an oxidative reaction of copper with atmospheric oxygen occurs. On models that allow you to regulate the temperature, it is recommended to reduce it when there are breaks in soldering, or simply turn off the soldering iron during this time.
Sequence of operations to remove scale:
- Carefully remove the sting.
- Clean off the scale layer with fine-grained abrasive paper.
- Apply a graphite protective layer to the tip by rubbing it with a pencil lead. This will slow down the reappearance of the scale layer.
- Lightly tap the body of the electric heater and turn it to remove scale from the recess for the copper rod.
- Insert the tip back into the mount.
To ensure electrical safety, each time before starting work, you should inspect the insulation of the network cable for the absence of mechanical damage and melting.
From time to time it is also useful to measure the insulation resistance value. The measurement is taken between the plug contacts and the tip. The value must be greater than 10 mOhm.
The sting is the main (and only) working part of the device. It is heated by an electric heater and heats the solder, rosin (or other flux) and the parts to be soldered. During operation, an invisible oxide film forms on it, reducing the wettability of the material. Visually it looks like this: tin or rosin does not spread evenly over the entire area, but collects in a drop and flows down.
The size and geometry of the working body are chosen so that they correspond to the operations performed. So, when soldering parts of large sizes and thickness, choose a powerful soldering iron with a thick tip. To install microcircuit legs, on the contrary, a particularly low-power device is required, with a thin tip and good grounding, so as not to damage sensitive components due to static charge or overheating.
Soldering microcircuits
A universal soldering iron is sharpened with a spatula. Thin parts are soldered with the narrow side, and more massive ones with the plane of the blade.
Tin the soldering iron tip
Before each soldering, the soldering iron must be re-tinned. The device must be turned on and wait until it warms up completely. In this case, the copper of the working body will acquire a red-orange hue. There is no need to overheat either, to avoid burning. The heated soldering iron should be pressed against a piece of rosin. The rosin will begin to melt and give off strong-smelling smoke. The melt should be evenly coated on the tip. Then you need to melt a small piece of tin and let it spread over the surface in an even layer.
How to tin a soldering iron with a copper tip
Tinning a soldering iron is a simple job and usually does not cause any difficulties. If the surface of the rod is well prepared and cleaned, then both tin-lead and silver solders fit well on it.
Soldering iron with copper tip
It is necessary to clean the surface of the rod to the condition of a new part. First you need to work with coarse sandpaper, level the surface and give it the required shape. If it is technically possible, it is a good idea to polish the surface - this way it will oxidize more slowly.
There is another technique - binding. To do this, the tip should be pulled out of the heater and, like a blacksmith, forged with a hammer on an anvil (or a massive vice). A surface compacted in this way will also oxidize much more slowly.
After machining, it’s time to actually tin the tip. Experienced shareholders recommend various methods:
- Place a few pieces of solder in the rosin can. Heat the soldering iron and dip the stripped tip into it. Rosin melt will act as a flux additive and will prevent the metal from becoming coated with an oxide layer. Instead, it will be coated with a layer of tin. Next, you need to take a square of coarse natural cloth and wipe the freshly tinned tip. In this case, the tin will rub over the surface and stick to it perfectly. The disadvantage of this method is a lot of smoke and a strong smell.
- The next method of tinning the tip produces less smoke, but requires more labor. A piece of coarse natural cloth should be laid out on a smooth board, sprinkled with crushed rosin or a whole piece should be placed on it. Dip the stripped tip into rosin and rub the surface with a solder rod. This operation will have to be repeated several times, and then rub the working surface on rosin cloth.
A soldering iron with a copper tip must be tinned each time before soldering and always after storage without use.
How to tin a soldering iron tip while working
If you carefully clean and tin the tip, then after half an hour of work, or even earlier, tin will no longer accumulate on it. The copper slowly began to burn, and slag residues accumulated on it. There is no point in pressing the soldering iron harder, stop for tinning. There are a number of techniques for tinning the tip.
Using a wooden block
A rough wooden block (spruce or pine, they contain natural resin, similar in composition to rosin). Pour a small amount of flux composition onto the block and put a small piece of solder. If you notice dross, you can strip and tin the tip again with little interruption.
In a metal sponge
This quick tin tip method will require some preparation. Place a household wire dish sponge in a metal cup. The lower part of the sponge should be coated with a thick flux, such as soldering lard. By slightly immersing the tip in the sponge, it can be cleaned of slag and scale. And if you pick up a drop of tin and immerse it deeper into the sponge, it will turn out to be tinned.
Tinning the tip with a metal sponge
This method can be used to clean and tin both a classic copper tip and modern ones made of nickel or ceramic.
In rosin
This traditional method of tinning requires a certain amount of dexterity and speed of movement. Copper oxidizes very quickly, and you may not have time to bring the tip from the point of mechanical cleaning to the container with flux. Therefore, they clean directly under flux, placing a file under the tip. You need to rub the tip over the file until the flux melts, after which you can tin it by holding a tin rod.
Tin the classic way
Another traditional method of tinning involves the use of refractory solder. The refractoriness of the solder allows it to evaporate more slowly from the surface of a tinned soldering iron and will remain on the copper longer. It will require:
- file with frequent notches;
- rough board made of coniferous wood;
- rosin;
- a piece of refractory solder.
The sequence of actions is as follows:
- put solder on the board;
- clean one side;
- dip deeply into rosin;
- quickly clean it on a board, running it over the solder;
- repeat for the second side.
Next, you should tin the round surface between the edges.
How to tin a modern soldering iron tip
According to manufacturers' declarations, tips made of ceramic or nickel do not require tin-plating. In real life, they are also susceptible to the formation of soot and scale. It will not be possible to tin such a soldering iron in the usual way. You will need:
- cotton rags;
- jar of rosin;
- solder rod.
Soldering iron with ceramic tip
You should wipe the tip on a rag and immediately immerse it in rosin. Along the tip you need to immerse a solder rod in boiling rosin. It will melt and stick to work surfaces.
Tinning methods
There are several ways to clean work surfaces before tinning:
- Using abrasive materials. Needle file, file, whetstone, sandpaper.
- Using forging. It is recommended to remove the tip before processing it.
- Using another soldering iron. The tips rub against each other.
After stripping, you should immediately, without waiting for the oxide layer to recover, immerse the tip in a container with rosin. A rod of solder is also immersed there, melting it and allowing it to spread over the surface of the rod. This operation should be repeated several times to ensure that the working surfaces are completely covered with solder.
Next, rub the tip on a pine or spruce board to ensure even distribution of the solder.
Tinning with rosin
The tip must be carefully inspected. If there are areas not covered with solder, the operation should be repeated until a dewy continuous layer is obtained.
You won't be able to tin it once and for all. Tinning needs to be repeated periodically.
How to tin a fireproof tip
The traditional tip, made of red copper, has a tendency to constantly burn out and form scale. Quite often it needs to be cleaned and tinned. On the other hand, work on desoldering highly sensitive to overheating microcircuits and other electronic components requires minimal presence of solder on the working part. Even the minimal heat that is stored in a drop of solder may be enough to damage them.
For the installation of such heat-sensitive parts, non-burning tips with a thin nickel layer are used. This coating is easy to scratch, and traditional sanding with a file or sandpaper for copper tips will quickly damage it. You should also not remove excess solder by tapping it on the stand.
Such working bodies can be tinned in the following way:
- prepare a piece of cotton fabric, rosin and solder;
- moisten it with cold water, squeeze lightly;
- place a piece of solder in a jar of rosin;
- rub the heated soldering iron firmly on the fabric, erasing the oxide layer;
- quickly dip the tip into rosin and melt the tin in it, allowing it to spread evenly;
- rub on cotton cloth.
Manufacturers recommend using special cellulose sponges. They are moistened with water or glycerin and the tip is periodically wiped with it to remove oxides and excess tin.
It is permissible to use a wire sponge made of copper alloys for this. Steel wire will not work - it will damage and tear off the nickel coating layer.
For non-burning soldering irons, compliance with the temperature regime is especially important - if it is exceeded, the tip may fail. You need to carefully monitor the temperature, and during breaks in soldering, reduce the power if the device is equipped with a regulator.
If there is no regulator, the soldering iron should be turned off during breaks. Advanced models have an automatic power control function. It uses information from the temperature sensor and reduces power if the device is in danger of overheating.
In addition to overheating, it is also harmful for non-burnt tips to be left without solder for a long time.
Fireproof tips have the added benefit of being easy to remove and replace. Whole sets of replaceable working parts are available, designed for different types of soldering.
Source: https://stankiexpert.ru/spravochnik/svarka/kak-zaludit-zhalo-payalnika.html
How to tin a soldering iron tip?
Oxidation is one of the main problems when soldering, as it significantly worsens the connection of metal parts and prevents the solder from taking up properly.
The soldering iron tip often suffers from such problems, so everyone who does soldering needs to know how to tin the soldering iron tip so that it does not deteriorate and continues to work under normal conditions.
If there is an oxidizing film on it, which appears when metal particles come into contact with oxygen, then difficult-to-solder materials will not be able to be joined. Problems also arise with simple operations for the same reason.
If you don’t know how to tin the tip of a soldering iron, then the work will most likely not be successful. No matter what techniques are used, in the absence of the basics it will not be possible to achieve the desired result. It is necessary to engage in this process both before starting work and if there are breaks during it.
How to tin the sting correctly?
Features of the soldering iron tip
The tip is the main working part of the tool, which is in contact with all parts, solder, workpieces, etc. It heats up itself and also melts all consumables at the required temperature.
Despite the fact that this part is made of durable metals that have a high melting point and good resistance to chemical attack, you need to know how to properly tin the soldering iron tip, since an oxidizing film begins to form on top of it. It is not visible without special devices, but the effect of the presence of this film becomes noticeable, since the molten solder does not remain on the tip, but simply spreads over it and falls down.
It is impossible to take the right amount of material and carefully place it in the required place. Tip preparation is necessary not only for old, used devices. You need to know how to tin the new soldering iron, since this oxide can also form on it.
The size of the tip and its shape influence which model needs to be selected for certain operations. The thicker the tip, the greater the power of the soldering iron and the higher the temperature it reaches when heating. The shape of the tip affects the ease of performing certain operations.
"Important!
The tip needs to be looked after so that it lasts as long as possible, since if it fails, the soldering iron will be useless. To do this, you need to constantly clean it of solder residues after finishing work.”
Sharpening
In addition to tinning the soldering iron, you also need to know how to sharpen the soldering iron tip. After all, only after proper sharpening can you work. This applies mainly to new models, but if, from repeated use, the tip has become overgrown with old solder residues, then this operation also needs to be carried out here.
Sharpening the tip of a new soldering iron
Sharpening involves creating the desired tip shape. The standard option is sharpening at an angle of 30-40 degrees on each side. The result should be a wedge-shaped shape. It is desirable that the sharp part of the sting be about 1 mm thick.
Source: https://svarkaipayka.ru/oborudovanie/payalniki/kak-zaludit-zhalo-payalnika.html
The process of tinning a soldering iron tip: how to tin new and copper coatings, correct work with solder
The need to tin a soldering iron arises when a molten drop of solder stops spreading over the heated surface and sticking to it; there is no way to supply a sufficient portion to the soldering point, which interferes with high-quality work.
The tip, receiving heat from the heater, oxidizes in air. In addition to reducing the adhesion of solder to copper, a layer of thermally insulating carbon deposits impairs heat distribution.
There are a number of ways to tin a soldering iron for the purpose of periodic maintenance of the working tool; such a procedure is also required for a new tip and one that has oxidized during storage.
Soldering iron sharpening
- The soldering iron tip is sharpened with a file at an angle of 30-40 degrees.
- The edge is left 1 mm wide and slightly blunt.
- On a new soldering iron, you only need to sand the tip with fine sandpaper to remove the patina. Patina is a greenish copper oxide.
- If store-bought sharpening is not satisfactory, then you need to remove the tip and forge it yourself, giving it the shape of a concave blade. This method has one more advantage - the metal will become less susceptible to corrosion.
- To give the sting a finished look, all that remains is to process it with a finely cut file.
Why tin and sharpen
Tinning the tip before soldering significantly simplifies all operations with a soldering iron, which consist of transferring molten solder to the contact area. This procedure can only be avoided if the purchased soldering device has a tip covered with a protective film of silver.
The silver-based coating holds solder well without compromising the thermal conductivity of the copper base.
However, products with such a coating cost a lot of money; In addition, the silver film comes off over time and exposes the copper base (they say that it dissolves in the solder). So in this case, after some time, the sting will have to be tinned, one way or another.
It is necessary to sharpen the tip with a file not only before tinning, but also in cases where it is necessary to give the tip a shape convenient for work.
Some users prefer the tip to be sharpened to a cone. Others try to sharpen its side parts in such a way as to obtain a flat, pointed shape.
Features of the sting
The sting is the main (and only) working part of the device. It is heated by an electric heater and heats the solder, rosin (or other flux) and the parts to be soldered. During operation, an invisible oxide film forms on it, reducing the wettability of the material. Visually it looks like this: tin or rosin does not spread evenly over the entire area, but collects in a drop and flows down.
The size and geometry of the working body are chosen so that they correspond to the operations performed. So, when soldering parts of large sizes and thickness, choose a powerful soldering iron with a thick tip. To install microcircuit legs, on the contrary, a particularly low-power device is required, with a thin tip and good grounding, so as not to damage sensitive components due to static charge or overheating.
Soldering microcircuits
A universal soldering iron is sharpened with a spatula. Thin parts are soldered with the narrow side, and more massive ones with the plane of the blade.
Overlapping sheet metal soldering
In the process of repairing car bodies and all kinds of various tin works, the need arises for soldering sheet metal overlay. There are two ways to stack sheet parts on top of each other: by tinning them first, or by using soldering paste that contains flux and solder.
In the first case, overlapping areas of parts after mechanical cleaning and degreasing are pre-tinned. Then the parts of the connection are applied to each other with degreased surfaces, fixed with clamping devices and heated from different sides using a soldering iron to the melting temperature of the solder. Evidence of successful soldering is the flow of molten solder from the gap.
After preparing the parts in the second method, the contact area of one of the parts is coated with a special solder paste. Then the parts are fixed in the desired position, tightened with clamps and, as in the very first case, the seam is heated on both sides with a soldering iron.
When purchasing solder paste, you need to pay attention to its purpose, since many solder pastes are intended for soldering electronics and do not contain active fluxes that allow steel to be soldered.
Special means
As special agents, it is allowed to use active organic mixtures (fluxes), as well as pastes of a special composition. The use of fluxes makes it possible to increase the efficiency of wetting the tip material with solder and, accordingly, improve tinning performance.
Domestic manufacturers offer several types of flux, which are available for public sale in hermetically sealed plastic packaging. When working with a composition consisting of ethyl alcohol with added catalytic additives, the temperature in the processing area does not exceed 300 degrees. This indicator satisfies the requirements for choosing the correct tinning mode for most materials used for the manufacture of tips.
The procedure for using active paste additives differs only in the way they are applied to the surfaces being treated.
Source: https://instanko.ru/drugoe/kak-zaludit-payalnik.html
How to tin a soldering iron quickly and correctly
The need to tin a soldering iron arises when a molten drop of solder stops spreading over the heated surface and sticking to it; there is no way to supply a sufficient portion to the soldering point, which interferes with high-quality work.
The tip, receiving heat from the heater, oxidizes in air. In addition to reducing the adhesion of solder to copper, a layer of thermally insulating carbon deposits impairs heat distribution.
There are a number of ways to tin a soldering iron for the purpose of periodic maintenance of the working tool; such a procedure is also required for a new tip and one that has oxidized during storage.
How to properly tin a copper tip on a soldering iron
Tools with nichrome heating elements have a copper round rod, which is given a shape convenient for soldering. Mechanical processing of the rod is carried out with a file, followed by finishing on sandpaper or a finely notched needle file. Then it is useful to lightly beat off the sting using a cold method on an anvil.
This will compact the top layer of copper, increase mechanical strength and reduce the rate at which the molten solder dissolves the material. It would be a good idea to polish it to reduce the rate of oxidation. All work is performed on the tip removed from the socket, including the part that is hidden inside the heating element.
Tinning a soldering iron tip means covering the working area of the rod with a thin layer of alloy.
The boiling flux dissolves the oxide layer on the copper core, and the melt coats the surface.
Since it is not difficult to tin a soldering iron with a copper tip, you can do it yourself as follows:
- Insert the cleaned rod into the soldering iron and turn on the power.
- When it warms up to the melting temperature of rosin, completely dip the tip into rosin.
There is no need to overheat the soldering iron, since immersing the rod in the flux causes the release of clouds of smoke with splashing and the formation of slag from burnt rosin. When heated normally, the resin melts and produces a small amount of smoke.
- Using a solder rod, rub the work surface covered with a layer of molten flux, which must be renewed periodically.
- The process is complete when a uniform thin layer of poluda is formed.
Excess should be removed with a wet cotton cloth.
The rod must be tinned with a composition with a high melting point, shown in the table.
| Brand | Compound, % | Melting point, ˚С |
| POS-61 | Tin 59-61 Lead 39-41 | 190 |
| POS-40 | Tin 39-41 Lead 59-61 | 238 |
| POSK-50/18 | Tin 50 Lead 32 Cadmium 18 | 145 |
| POSu-95/5 | Tin 95 Antimony 5 | 240 |
POS-40 or POSu-95/5 form a high-quality coating that must be renewed as it fades.
How to tin the tip of a modern soldering iron?
Core manufacturers claim that their products do not need to be tinned. This is partially true for those rods that are used by feeding solder with wire or paste into the working area. The tip heats the connection with flux applied to it, melts a drop of alloy from the wire, which, spreading over the hot one, forms a strong connection.
Nickel also oxidizes in air, although at a slower rate than copper. The oxide layer impairs heat transfer, reducing the efficiency of soldering heating, so it is better to tin the working side. This must be done without damaging the coating. To do this, use a wet cotton rag, a jar of solid rosin and POS.
Rules for how to tin a new soldering iron:
- The working surface is degreased.
- The power is turned on.
- The heated core is cleaned with a wet rag and immediately stuck into rosin.
- A piece of solder added to the jar is ground without removing the rod from the flux.
- After a short time, the tip will be covered with an even layer of tin.
Most often, a conical shape is used for the sting. It is enough to tin the tip of the cone 3-5 mm.
Features of tinning a modern soldering iron tip
Nowadays the rods are made of copper coated with a thin layer of nickel, which protects them from burning or ceramics. Mechanical processing is not allowed, it cannot even be scratched. To remove excess POS or flux burnout products, you can wipe it with a piece of wet, non-synthetic cloth, if you do not have a special sponge or cleaner made from brass shavings.
How to tin a non-burnable tip?
The tip is easily tinned if it is hot and thoroughly wiped with a damp cloth without synthetics and immediately dipped into the flux. Then use an alloy stick to rub the work surface until half-painted, wipe the rod with a rag and start working.
How to tin a soldering iron tip with a wooden block?
If there is a significant layer of oxide on the surface, and it cannot be removed mechanically with abrasives or files, a block or plank of coniferous wood helps well when tinning.
- Place the beam so that the wood fibers are oriented perpendicular to the movement when rubbing.
- The power is turned on, small pieces of rosin and POS are laid out on the board.
- The heated rod is placed in a piece of rosin, which forms a melted puddle.
- The tip covers the tin.
After melting, the tip begins to move across the fibers without leaving the rosin.
The oxide layer is dissolved by hot rosin, and the alloy is rubbed into the surface.
How to tin a sting in rosin?
A slightly oxidized surface can easily be tinned in a jar of rosin with a piece of POS placed there. Using a wiped tip, melt the alloy in a container with rosin. Such work is accompanied by the release of large amounts of resinous smoke and should be performed in fresh air or in a well-ventilated area.
The durability of the coating or half-tip is determined by the temperature regime. It is harmful to use a soldering iron at maximum power unless necessary. Where it is impossible to regularly change the heating temperature, use adapted power regulators and homemade voltage limiters during soldering pauses.
Source: https://pauk.top/kak-zaludit-payalnik.html
How to tin a soldering iron: preparation and care of the soldering iron
> Tools > How to tin a soldering iron: preparation and care of the soldering iron
Soldering is the physical and chemical process of forming a connection between parts when solder interacts with the metal being soldered. Unlike welding, the working surfaces are not melted, but are wetted with solder.
What does a simple soldering iron look like?
An indispensable condition for the soldering process is melting the solder and wetting the surface of the working tool with it. Over time, the soldering iron tip turns black and stops working. Therefore, you need to know how to restore it - how to properly tin a soldering iron tip. The photo below shows the surface of the tool oxidized and covered with solder.
Soldering iron tip surface: 1) oxidized surface of the tool; 2) coated with solder - tinned
In the first case, you should not even try to solder, since the oxides prevent the solder from retaining on the surface of the tip.
The soldering iron will be ready for use only when its tip is covered with a layer of molten material with a lower melting point than the metals being joined.
Soldering materials
Solder is used for soldering - a material used to join metal surfaces and having a lower melting point than the materials of the parts being joined.
Solder consists of different alloys, which may include tin, lead, copper, nickel and cadmium. It is made mainly in the form of rods and wire.
Soldering is necessary to create a connection, reduce the contact resistance of the electrical contact and protect the connection of parts from oxidation.
The solder must have the property of wetting the base. In this case, it diffuses into the base metal, and it dissolves in the solder, forming an intermediate layer that, after solidification, connects the parts as one whole.
For soldering irons, soft solders with a melting point from 1910C to 2800C are used. Their main components are tin and lead in different proportions.
It is necessary to remove oxides from the surface of the metals being joined for soldering. Fluxes are used for this. In addition, they promote better solder spreading and protect surfaces from the external environment.
Flux is used in solid, liquid and paste form. It may be located inside a solder tube.
The following are used as flux:
- rosin;
- acetylsalicylic acid;
- orthophosphoric acid;
- salt;
- glycerol;
- ammonia.
Common fluxes for soldering in solid, liquid and paste form
Fluxes must provide low leakage current and be non-corrosive.
Soldering principle and process
Soldering is done by capturing solder and flux with a soldering iron tip, inserting them between the parts to be joined and further heating the contacting surfaces until they are wetted with solder, which subsequently hardens to form a joint. To do this, stop heating.
How to tin a sting?
After sharpening, the tip should be tinned with a thin layer of solder. To do this, turn on the electric soldering iron and heat the copper rod until it takes on a reddish-orange hue.
You don't need to wait long, otherwise the rod will burn. After heating, the entire tip is immersed in rosin, and then a piece of solder is melted and the entire working surface is covered with it.
If you rub the tip on the surface of the wood, the solder will better cover the working area of the soldering iron.
The layer of solder on the tip should be uniform. If the surface is partially covered, the process is repeated. Once the soldering iron is ready for use, it can be used for soldering products.
Soldering iron overheating
In the absence of a voltage regulator, the soldering iron can heat up above 3000C, which leads to its burning. If it is not possible to measure the temperature of the tip, overheating can be noticed by boiling and splashing of rosin.
You can reduce the temperature of the soldering iron using a power regulator - a dimmer. Here you can select a conventional incandescent lamp brightness control device. It is important that it matches the power.
You can assemble a thyristor regulator on the Kr1182PM2 microcircuit with your own hands, which allows you to control devices with a power of up to 150 W.
Do-it-yourself microcircuit-based power regulator
Lamp HL1 is shown as the load. Instead, you can connect a soldering iron, which is an active load. The power is regulated by variable resistor R1.
Dimmers provide smooth switching on and off of the load. This is not required for a soldering iron and you can get by with a simpler device.
Circuit diagram of a simple thyristor regulator
The positive half-cycle is not controlled and passes through the diode VD1. Regulation is carried out only through a negative half-cycle by controlling the thyristor VD2 using a variable resistor R2. This is quite enough for a soldering iron.
Miniature control devices are built into the handle of the soldering iron. The best ways to maintain optimal soldering temperature are used in soldering stations, where the mode can be manual or automatic.
Common soldering station "Weller"
For a home network with a stable supply voltage, manual heating control is sufficient, depending on the brand of solder.
The soldering iron wears unevenly. When burned out, irregularities appear on the surface of the tip. From time to time it needs to be sharpened and tinned.
Copper dissolves in solder when heated, and prolonged heating without use leads to the formation of a layer of oxides. Therefore, it is recommended to turn off the soldering iron or reduce its temperature during pauses.
Securing the soldering iron tip
The presence of a removable tip allows it to be removed and sharpened. But in many designs, additional fixation is required, since the rod begins to dangle and fall out. It has a metal sleeve that fits on top. If it is constantly removed when replacing the tip, the strength of the connection will decrease. You can leave the bushing in place, but over time it will jam and it will be difficult to remove the tip.
To create a reliable connection between the soldering iron body and the tip, the sleeve is replaced with another so that it can be easily put on. Then a hole is drilled in it and an M3 or M4 thread is cut. After the sleeve is put on the tip, a screw is screwed into it, creating a reliable connection and preventing the tip from turning. The figure below shows a soldering iron disassembled (a) and assembled (b), where a regular nut is used as a sleeve.
What does the fastening of a replacement soldering iron tip look like?
A removable tip is also necessary for a soldering iron to regulate its temperature. If you insert it into the heater at different depths, the temperature of the working part will change.
Periodically it is necessary to remove scale from the joint. When it accumulates, the operating temperature of the soldering iron decreases. Cleaning is carried out as follows:
- remove the copper rod from the soldering iron using pliers;
- remove scale with emery cloth;
- apply a layer of graphite to the rod by rubbing a pencil lead on it;
- remove the remaining scale from the hole in the heating element by lightly tapping it;
- install a new or return the old copper rod and secure it with a bushing and screw.
The insulation of the soldering iron should be checked periodically. To do this, set the ohmmeter to the megaohm limit (1-10 mOhm) and measure the resistance between the tip and the pins of the soldering iron plug, which should be infinitely large.
Soldering lessons.
How to solder correctly with a soldering iron
The basics of soldering for beginners are collected in this video.
The soldering iron burns out over time during operation. Its tip must be periodically sharpened and tinned. If there is a non-burning coating, the working surface is cleaned with special chemicals, after which it is also tinned. During operation, it is important that the soldering iron does not overheat.
Source: https://jelectro.ru/instrument/payalnik-podgotovka-ukhod.html
How to tin a soldering iron tip correctly
If you have purchased a new soldering iron from which you can remove the copper rod without difficulty, it is a good idea to make a small modification that will significantly increase its service life. Copper itself is a soft metal, and its structure promotes rapid oxidation.
However, if the tip and the entire copper rod are forged, the metal structure becomes significantly denser. Such a rod will be less subject to oxidation and burnout. With good forging, the service life of a copper rod can be increased by 30 times. You will forever forget about replacing the soldering iron rod.
Homemade soldering iron temperature controller
The rod is forged over its entire surface using a small hammer. At the beginning of forging, the hammer blows are stronger, and then the force of the blows decreases. At the end of forging, use gentle blows to smooth out the unevenness to its original appearance. The shape of the sting is also made by forging, bringing it to an almost ideal form.
The level working surface is adjusted using a zero. Insert the forged rod into the soldering iron, heat it to operating temperature, again grind the working surface with a zero, wipe with a damp cloth and apply rosin and solder. Typically, the temperature of the soldering iron does not exceed 250° C.
As the temperature increases, the soldering iron tip oxidizes more, and the solderings are of poor quality. Therefore, it is advisable to have a soldering iron tip temperature regulator, at least a simple one. At worst, you can use a D226 diode (for a 60 W soldering iron).
Device for preventing overheating of a soldering iron using a diode
The diode is connected in such a way that the weight of the soldering iron lying on the holder, through a microswitch, turns off the network and connects it through the diode. The reduced voltage will not overheat the soldering iron during breaks in operation. The fireproof conical tip is tinned like a regular one, but before that it is wiped with a damp cloth on a heated soldering iron and the tip of the rod is tinned. The fireproof tip does not suffer mechanical damage, so it must be handled with care.
Source: http://electricavdome.ru/kak-zaludit-zhalo-payalnika-pravilno.html
How to tin a soldering iron?
Radio electronics for beginners
If this page is visited by those who already know how to solder correctly, then the information is unlikely to be useful to you; this is a manual for beginners.
Radio electronics for beginners begins with soldering. This is an axiom. Learning to solder is quite simple, as in any business, you need practice. If the soldering kit is ready, then it’s time to start preparing the tool.
Before soldering, you need to prepare a new soldering iron for use, or rather, sharpen the tip to a certain shape and cover it with a thin layer of solder.
The tip must be sharpened with a file at an angle of 30-40 degrees, so as to form a wedge. The sharp edge of the sting should be blunted to create a flat edge about 1 mm wide. Usually, new soldering irons have a tip already sharpened with a wedge, but it is covered with a layer of patina - greenish oxide of copper and oxygen. This oxide must be removed with a metal file or fine-grained sandpaper.
In addition to the “classic” wedge-shaped tip, you can give it another shape, it all depends on what you will be soldering. For soldering small parts, you can make it shaped like an elongated cone with an edge width of 2 - 3 mm. Or make a cut in the edge so that you can solder SMD resistors with one touch.
Immediately after sharpening the tip, you need to install it in the soldering iron and tin it. If you do not do this, the copper surface of the tip will oxidize in the air and it will have to be sharpened again!
Soldering iron care
Like any other tool, a soldering iron requires care. From time to time, the tip of the soldering iron burns out, and potholes and irregularities appear on it. Burnout is eliminated by sharpening the tip and tinning it. You should also pay attention to the fact that with prolonged use, the rod becomes covered with scale, which prevents rapid heating.
Why does the soldering iron tip burn out? The fact is that when heated, copper partially dissolves in the solder, and the edge of the tip itself is subjected to, albeit a small, mechanical effect.
It is also worth understanding that when the soldering iron is not in use, the tip becomes very hot and this contributes to the oxidation of copper. Therefore, when idle, it is recommended to either turn off the soldering iron or reduce the temperature.
A conventional electric soldering iron of the EPSN type does not have temperature control, so it is better to turn it off when idle.
Scale is removed as follows.
Use pliers to remove the copper rod from the soldering iron. Remove scale from the rod using fine-grained sandpaper. You can coat the lead with a small layer of graphite by rubbing it on the lead of a regular pencil. This will prevent rapid scale formation in the future. By lightly tapping the heating element of the soldering iron, remove scale from the heating element where the copper rod was installed. Install the copper rod in its original place.
The insulation condition of the electric soldering iron should be checked from time to time. To do this, measure the resistance between the soldering iron's power plug and the soldering tip. I have already talked about how to measure resistance. The ohmmeter should be set to a megaohm measurement limit (1 - 10 MΩ).
Remember that you cannot touch the metal probes of the multimeter with your hands when measuring resistance. Otherwise, the device will show the total resistance of your body and the measured circuit. The device should show infinitely high resistance.
This will be evidence of good insulation between the soldering iron tip and the electrical network.
For those who have already acquired a soldering station, replaceable 900M copper tips are suitable. They also require preparation before operation.
» Radio electronics for beginners » Current page
also be interested to know:
Source: https://go-radio.ru/campayka.html
Rules for sharpening and tinning soldering iron tips
To obtain a high-quality solder joint, you must maintain the required soldering mode, determined by the temperature in the working area, the composition of the solder, as well as the condition of the soldering iron tip. This part is traditionally made of copper, but in some cases special protective coatings are applied to the tip to extend its service life.
Preparing a new soldering iron
Preparing a soldering iron for work involves calcining its executive part (tip) to a state in which it can fully perform its functions.
The fact is that any soldering tool just brought from the store has traces of copper oxides on the tip (they are formed after prolonged contact with air). Naturally, this coating worsens contact with working compounds (solder and flux).
Preparing the tool for work means eliminating all interference with good adhesion of the tip surface to the solder.
To achieve this, the following steps must be taken:
- First, the tip should be thoroughly calcined until the metal acquires a reddish-orange tint. From this moment it will burn, that is, the process of thermal burning of oxide residues begins, accompanied by a characteristic pungent odor.
- Secondly, after a certain time, when carbon deposits characteristic of copper appear on the surface of the tip, you should scrape it off with any sharp metal object.
- Thirdly, the soldering iron tip, cleared of carbon deposits, must undergo another operation called tinning. In order to tin high-quality tips of any type, you should learn to distinguish between the options for their execution.
Tinning in rosin
Before choosing a tinning method, try to find out the structure of the material from which the soldering iron tip is made. Thus, a copper tip cleaned of scale can be tinned in ordinary rosin and solder.
To do this, you need to immerse the end of a hot tip in rosin and melt a piece of solder placed under it. This should be done in such a way that the molten liquid mixture completely covers the surface of the tip.
Sometimes the solder “sticks” to the surface being processed with great difficulty (that is, the soldering iron tip does not tin). What to do in this case?
It is necessary to transfer the soldering composition along with rosin to the bottom of a small metal container and melt them there until a liquid mixture is obtained. Then you should take a new soldering iron and forcefully scrape the tip along the metal bottom with the molten bath. This operation should be carried out until the entire tip is completely wetted in solder.
Metal sponge
There are often soldering irons on sale with the working part coated with special protective compounds made of stainless steel (this coating is called “non-burnable”). It has a thickness of several microns, so sharpening and tinning the tip is completely unacceptable due to the possibility of destruction of the coating due to strong friction.
In this case, the simplest method of dry tinning and cleaning the tip is used, using a steel sponge.
Its spring cells ensure good grinding of the tip and allow you to quickly tin its working surfaces. This method can be used when preparing soldering irons equipped with ceramic and nickel tips, as well as those with a very thin tip.
The special steel mesh can be replaced with a regular kitchen sponge. To clean the sponge itself, simply tap the mesh on the table, after which all the remaining solder will fall out at the bottom of it. The cost of this cleaning accessory does not exceed fifty rubles, so you can buy it immediately with a reserve.
With any of the proposed options, damage to the soldering iron due to strong pressure is practically excluded.
File and sandpaper
The classic way to prepare and tin a soldering iron tip before starting to work with it is to process it with a file (sandpaper) together with the use of high-quality rosin.
When preparing a tip using this method, you first need to sharpen one of the edges of the tip with a finely cut file, after which it is immersed in rosin and rubbed over a wooden board with molten solder.
Note that this procedure must be repeated several times. Upon completion of tinning, one facet should be sharpened and tinned in the same way.
To tinning a copper tip sharpened “to a cone”, it is first sanded with sandpaper along the entire working circumference, after which it is tinned with a rotational movement on a wooden lining with molten solder.
Soldering iron with permanent tip
Tinning a so-called “eternal” or fireproof tip usually causes difficulty (even when using flux). On the forums we managed to find a technique whose author suggests the following sequence of actions:
- Take a piece of clean cotton cloth, generously soaked in water.
- Then the solder is placed in a jar of rosin, after which they proceed to tinning.
- First, you should walk the hot tip over the wet fabric a couple of times, which will allow you to get rid of the oxide film on it for a short time.
- Without waiting for the formation of a new connection, you need to quickly immerse the tip of the solder in rosin and drown a lump of solder in it, bringing it to a molten state.
In this way, it is possible to dissolve the remaining oxides in the rosin, which are immediately replaced by the tinning composition.
The considered tinning methods allow you to quickly and efficiently prepare the tip for soldering work, and also ensure the safety of this part of the tool for a long time.
Source: https://svaring.com/soldering/praktika/luzhenie-zhala-pajalnika
Preparing the copper tip
Solder fits well on a slightly heated tip, but with one condition - it must be clean. This is only possible at low temperatures, since a split tip is difficult to manipulate. The task at the beginning of work is to clean the tool. After heating, the oxidized layer should be periodically ground off to improve adhesion.
You can remove the rod from a cold soldering iron and thoroughly clean it. This will prevent you from accidentally damaging the heater. The entire tip is treated completely, since copper inside the heater is also oxidized due to high temperature. This impairs heat transfer and energy is wasted.
Before tinning a soldering iron with a copper tip, it should be cleaned of dirt. The work is done with a file and sandpaper. The material is sharpened to a clean layer so that the copper looks like new. First, a rough cleaning is carried out with a file, and then the surface is polished with sandpaper until it is smooth.
Experienced craftsmen bind the tip, which somewhat reduces the rate of oxidation. The process involves uniformly strengthening the surface of the copper rod with gentle blows of a hammer on an anvil.
Tinning of a copper tip is carried out in 2 ways - with rosin and rubbing with tin. The first option is characterized by high smoke generation, so it is not recommended for residential premises due to the health hazard. The procedure is recommended to be carried out on the balcony.
The cleaned tip is placed in a container with rosin, where a little solder is first placed, which instantly covers the tip and prevents it from oxidizing. Afterwards the sting is wiped with natural cloth. Do this carefully so as not to get burned.
They try to rub solder into the copper.
Tin rubbing is a virtually smokeless method. The cleaned tip is heated and dipped in rosin. Afterwards, the warm surface is rubbed with tin. The procedure is repeated several times, the protective layer is rubbed with cloth.
Initial treatment of the base with spraying
A tip coated with ceramic or nickel does not need to be tinned, as manufacturers advise, but this is nothing more than an advertising ploy. Such coatings are also prone to oxidation, but the process is slower. It will not be possible to tin the soldering iron tip of a modern soldering station using a proven method - this will destroy the coating.
These tips are cleaned with a small piece of cotton cloth. To do this, add solder to the rosin and dip a heated tip into the mixture, which is first rubbed with a rag. The molten solder envelops the tip and forms a protective layer.
Tinning during soldering
Preparation for work is carried out in a calm environment. After some time, the adhesion of the tip decreases as the copper begins to burn. This usually starts within 5-10 minutes. There are several ways to properly tin a soldering iron while working.
Wood block
A board made of coniferous wood should always be at hand by the master. This wood contains natural rosin. Flux is poured onto the block and a little solder is placed. As soon as the sting loses adhesion, it is rubbed against wood. Thus, you can not only clean, but also tin the soldering iron.
The method is fast. Factory soldering stations have a container with a metal sponge. At home, they use a regular metal sponge.
Experienced craftsmen lubricate the lower part of the sponge with flux. Shallow immersion of the tip will allow for simple cleaning. But if you dip the base in solder, and then immerse it deeply in the sponge, reaching the flux layer, then cleaning will be combined with tinning.
It is difficult to damage the tool even with strong pressure. The method is suitable for any type of device.
Proven method and prevention
The previous methods were invented relatively recently. Our ancestors carried out tinning a little differently, using a file with a fine notch. You will need a workbench to do the work, which is sometimes replaced with a board, as well as rosin and refractory solder.
Procedure:
- Clean one side of the base.
- Dip the instrument deeply into rosin and rub it on the wood with the clean side.
- Contact with wood is carried out at the place where solder has been previously laid. The procedure is repeated several times.
- They are engaged in the second side.
- Tin the remaining surface of the rod.
The procedure will take at least 10 minutes. This time pays off in that you can work with the tool longer without additional cleaning.
Preventive measures against oxidation:
- The temperature regulator in the soldering station should be set to the lowest possible value.
- Maximum power is set only in case of emergency.
- Experienced craftsmen equip the soldering iron stand with a switch with a voltage limiter: the heat is maintained when the tool is not in use, and the coating does not oxidize.
- After each soldering, the coating is restored.
Conscious craftsmen always have a tool at the ready. It is advisable to tin the soldering iron tip after work and additionally before it, after long-term storage. Preventative measures during soldering will help get rid of weak adhesion of solder to a tip made of any material.
Source: https://220v.guru/fizicheskie-ponyatiya-i-pribory/payalniki/zhalo-payalnika-pravilno-zatochit-vosstanovit-zaludit.html
Instructions on how to tin a soldering iron tip: features of preparation for soldering and tip care
In a modern home filled with appliances, there are often simple breakdowns that, with the right skills, can be easily fixed on your own. The most common failure is disconnection of contacts and rupture of wires. At home, this problem can be dealt with using an ordinary soldering iron.
Many sites have instructions on how to choose the right soldering iron and solder yourself, and how to choose solder and flux. But for the most part, the instructions omit such an important question as how to properly tin a soldering iron.
If you incorrectly prepare the tool for work, the results of your efforts will be completely poor quality, and the contacts in the device will be unreliable.
Types of soldering irons
It is important to know that different types of soldering irons require different pre-treatment methods.
The tinning method is mainly influenced by the material from which the soldering iron tip is made.
Copper
The most popular and affordable are tips made from copper and its alloys. This metal has good thermal conductivity, but has a large minus - the copper tip is very soft and for this reason wears out very quickly. Also, copper tips are not suitable for working on small radio components.
Non-burn tips
Unburnt tips have much better characteristics. They are also made of copper alloys, but have a special protective coating of nickel or silver.
You won’t be able to find instructions on how to tin the tip of such a soldering iron - this process is performed at the tip manufacturing stage, and thanks to the special coating, this operation will no longer have to be repeated.
Steel
In rare cases, you can find soldering irons with a tip made of steel. This material is much more durable and strong compared to copper, but has very poor thermal conductivity. This causes the very low popularity of soldering irons with steel tips.
Ceramics
Recently, soldering irons with tips made of ceramics have become increasingly popular. They have enviable thermal conductivity, are not covered with oxides and, as a result, do not require tinning.
Also, due to its density, the ceramic tip can be very thin, which is ideal for working with small radio components and creating designer jewelry.
Composite tips
On sale you can find tips made from several metals at once. When creating such parts, all the pros and cons of each of the metals used are taken into account in order to fully reflect its advantages and neutralize its disadvantages.
The most popular combination of metals is a combination of steel, copper and nickel. Hard steel serves as an axis of rigidity, soft copper serves as a good conductor, and the nickel coating protects the copper tip from oxidation.
Beginning of work
Getting started with a new tool versus a previously used tool is completely different.
How to tin a new soldering iron?
It is worth remembering that only copper and steel tips need tinning. For others this procedure is not required.
You should start working with a new soldering iron by removing patina from its surface - a greenish coating created by oxidation products. The patina is removed using fine-grained sandpaper. Then you can proceed directly to tinning.
To know how to tin a copper soldering iron, you need to know what tinning is. This term refers to covering the surface of the tip with a thin layer of heated solder. This operation will help prevent metal oxidation during operation, which will have a beneficial effect on the quality of the seam.
After removing the oxides from the new soldering iron and giving the old tip the desired shape, you can begin tinning. To do this, the soldering iron is heated to the melting temperature of rosin, after which the tip is processed.
Next, you should wait until the soldering iron warms up to its operating temperature and immerse the working surface of the tip in a small piece of solder so that the tip is evenly treated with solder.
To make this process easier, you can see a photo of how to tin a soldering iron. This will help you choose the optimal amount of solder and rosin to complete the job.
Photo instructions on how to tin a soldering iron tip
We also recommend viewing:
Help the site, share on social networks 
Source: https://instrumentgid.ru/instrukciya-kak-zaludit-zhalo-payalnika/